The Service super-node is located within the Navigation Tree. It appears directly below the Hardware super-node. Refer to "Adding or modifying a service” for additional information on creating, editing and deleting services.
Services allow the user to logically group or isolate hardware from one or more frames to create a logical relationship between the physical characteristics of your network and the actual setup of your broadcast center. The hardware contained in a service view follows the same "Rules of Broadcast" outlined in the Alarm Indication section. When an alarm occurs on a hardware device contained in a service, the alarm condition is broadcasted up to the Service, and subsequently the service super-node.
Note that there are exceptions to this rule when viewing alarms in the service view. Consider where a frame has two products but only one of the products has been added to the service view. If the product in the service view has a minor alarm condition, but the product not contained in the service view has a critical condition, the frame in the service will reflect a critical alarm condition. This is because the service view indicates the actual state of the frame, not the perceived state of the frame in the service. In order words, the frame contained in the service does not simply show the alarm status of only the products contained in that service.
It is also possible to see an alarm condition on a frame in the service but not see any alarm conditions on any of the products shown in the service. In this scenario the frame has an alarm condition and you should check the Hardware super-node to determine which product is causing the frame to show an alarm.
To Create a New Service:
Adding Hardware to a Service:
VistaLINK PRO allows the user to add hardware to a Service using two different methods.
Method One (Drag and Drop):
In the Navigation
Tree under the Hardware super-node, locate the hardware device you wish
to add to the newly created service.
While holding down
the left mouse button, drag the selected hardware device over the name
of the service you wish to add it to and release the mouse button to add
it to the service.
Method Two (Right Click Add)
In the Navigation
Tree under the Hardware super-node, locate the hardware device you wish
to add to the newly created service.
Right click the hardware
device and select the "Add to Existing Service..." option.
A dialog will appear listing all created Services allowing the user to select the service the hardware device should be added to.
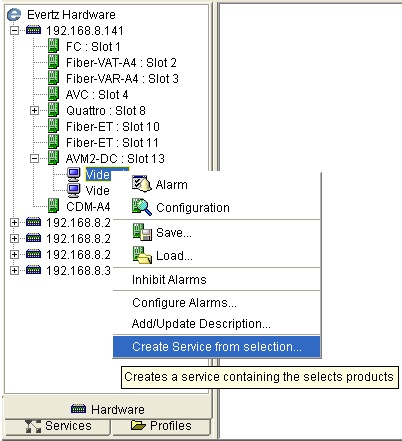
An alternate and faster way to create a service is to highlight all devices to be part of the service in the Navigation Tree (hold the "Ctrl" key to select multiple items). After all items are highlighted, right click the selected devices and choose the "Create service from selection" option from the pop-up menu. The user will be prompted to enter a name for the service, which will then be added to the Service Tree View list.
A user created service can be renamed at any time. To rename a created service:
In the Navigation Tree, right click the service to be renamed and select the "rename service" option.
The Rename Service
dialog will open allowing the user to enter a new name for the service,
enter the new name and click "OK".
All local and remote clients will immediately update their Navigation Tree as well as any Monitoring Client grid cells containing the service to display the new service name.
To remove a Service, right click the Service in the Navigation Tree and select the Delete Service option.
To provide a second level of organization for Services in the Navigation Tree, VistaLink PRO provides the ability to further group user created services into Service Groups. Grouping services into Service Groups provides a method for the user to logically organizing created services according to their environment. Service Groups also provide a better view of the Service Tree View fault indications for installations that utilize a large list of services. The Service Group Mode feature can quickly be enabled or disabled allowing the user to easily switch between a short Service Group list or a complete Service list display in the Navigation Tree.
Ensure the Services super-node is visible by enabling though the Tree Properties dialog. (the Groupings option must be enabled in order to create Service Groups.)
Select one or more Services in the Navigation Tree (use the ctrl key to select multiple services). Once the selection is complete, right click the selected services and choose the Create Service Bundle from Selection... option.
Service Groups can also be created by right clicking the Service super-node then selecting New -> Service Group. Once the new Service group is created Services can be added by dragging them to the new group while holding the left mouse button down.