CSP Panel Editors
CSP panels are supported in U-CON V4 but not as a full graphically depicted form of the panel. CSP panels are supported in a simple list fashion. The lists provided are adjusted in size according to parameters for any given CSP panels. Other items such as keypad layout options and pass code specification are provided as they apply.
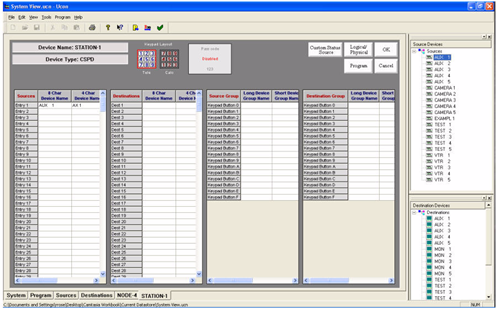
Unlike the UCP and SCP panels, the CSP tables (illustrated above) are ‘include’ as opposed to exclude tables.
- Add, by dragging to the panel, all Sources you intend to use from the listing.
- Button-per-source panels will be specific inputs assigned to each button.
- For the desired Destinations used on each panel, drag (to the panel) each destination you intend to use from the listing.
- Assign a direct destination by dragging a destination from the “Destination Device” section of the screen and dropping it onto the direct destination buttons. After you have dragged one direct destination you can select the next three just by clicking on another “Destination Device” and it will be automatically assigned to the next button.
- Assign a direct source by dragging a source from the “Source Devices” section of the screen and dropping it onto the direct source buttons. After you have dragged one direct source you can select the next direct source by clicking on another “Source Device”. It will then be automatically assigned to the next button.
- To configure a group on a group button, left-click on any device in that group (from the “Source Devices” or “Destination Devices”) and drop it on the desired button. All of the sources or destinations in that group will be included in the panel, except the ones that are placed in the “Exclude” list.
- Devices can be “Excluded” from the panel by dragging any single or a range of devices from the “Destination Devices” or Source Devices” list. To select a range, click on the first device then while holding down the shift, click on the second device that you want to exclude. Now drag the highlighted section and drop it on the source or destination exclude list.
- The panel will use the first Direct Destination as the default destination (the one that it will use when the panel powers up).
- To unassign a group name, direct destination, or source on a button, use the right mouse button and click the button that you want to unassign.
- For telephone or calculator style, click the corresponding keypad mode.
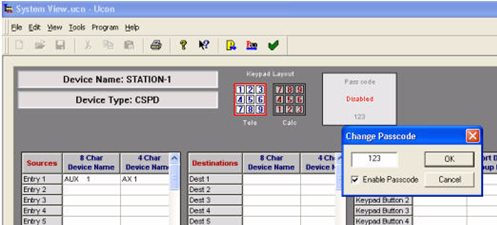
- To add a passcode for panel locking, left-click the passcode, enter the desired three digit number, check enable passcode, then click OK. Reprogram the panel to complete.
- All odd destinations such as 1, 3, 5, etc., are considered Program 1 switching entries, while the even destinations (2, 4, 6, etc.) are considered Program 2 switching entries on the control panel. The toggle switch on the panel layout allows you to move from the ‘odd’ destination group to the ‘even’ destination group, or PGM 1 and PGM 2. This applies to any panel containing a PGM 1 and PGM 2 switch.
- The CP-4’s panel icon will always remain red during panel programming. To solve this, you must remove the cover from the panel itself and move the board’s jumper to the program position, then push the Take button on the panel. Once complete you can program the panel by right-clicking (the panel icon) and clicking the Program button.