VistaLINK™ PRO provides an easy to use interface for adding a grid to the Monitor Client for Service Monitoring
Select Grid
-> Add -> Grid on the main menu or click the  Add Grid button
on the toolbar. The Add Grid properties window will open allowing
the user to establish the parameters for the new grid.
Add Grid button
on the toolbar. The Add Grid properties window will open allowing
the user to establish the parameters for the new grid.
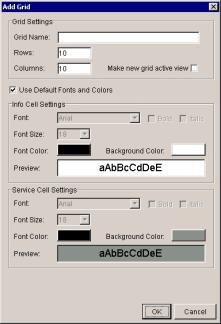
Enter a name for the new grid in the Grid Name text box. This name will be displayed along the bottom of the grid display window indicating the currently active grid view.
Enter the number of cells the grid should contain by supplying the appropriate row and column values.
Check the “Make new grid active view” to set the new grid to be the default grid shown in the grid display area.
Uncheck the “Use Default Font and Colors” check box in order to manually configure the font type, font size, font color and background colors the grid will use for the Info and Service cells.
Click OK to accept the settings and create the new grid view.
To edit an existing grid view, ensure the grid is currently
active by clicking its corresponding select button and choose Grid
-> Properties from the main menu or click the  Properties
button on the toolbar.
Properties
button on the toolbar.
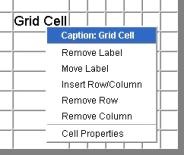
Right clicking a cell in an existing grid will open a pop-up menu with options to modify the existing grid or the properties of the clicked cell.
Changing the Default Grid Properties
When creating a new grid the Monitoring Client will use the default grid properties to establish the initial grid size, font type, font size, font color and background color of the new grid. To change the default grid properties select "Grid" from the main menu then select "Default Properties". Change the settings to establish a new default grid profile and click OK to activate. Clicking the "Restore Defaults" button in this window will return the Grid Defaults to the values displayed when the dialog was opened.
To delete an existing Grid select Grid
-> Remove -> Grid from the main menu or click the  Remove Grid
button on the toolbar. Select the grid to be deleted in the drop
down menu and click OK to remove
the selected grid.
Remove Grid
button on the toolbar. Select the grid to be deleted in the drop
down menu and click OK to remove
the selected grid.
The Monitoring Client allows the user to add established services to a grid view to allow for a visual representation of a monitoring wall display. To create services to add to a grid please refer to “Creating and Editing Services”.
To add a service to a grid view, ensure the target grid
is displayed in the active grid display area. Click Grid
-> Add -> Service from the main menu or click the  Add Service
button on the toolbar. Choose the service to add from the Select
Service drop down menu, set the Row and Col
values to the coordinates of the target cell and click OK. The service
will appear in the grid at the cell coordinates specified as a filled
cell location using the colors set in the grid properties.
Add Service
button on the toolbar. Choose the service to add from the Select
Service drop down menu, set the Row and Col
values to the coordinates of the target cell and click OK. The service
will appear in the grid at the cell coordinates specified as a filled
cell location using the colors set in the grid properties.
An alternative method of adding a service to a grid is to right click an empty grid cell in the active grid display area and select Add Service. This option will automatically set the Row and Col values in the Add Service window to the coordinates of the clicked cell.
NEW - Drag and Drop Method
As of VistaLINK PRO version 7.x.x, services can now be placed into grid cells by holding the left mouse button and dragging the service from the Navigation Tree to the desired grid location. Release the left mouse button to drop the service into place on the grid.
Removing a Service from a Grid
To remove a service from an active grid select Grid
-> Remove -> Service from the main menu or click the  Remove Service
button on the toolbar. Select the service to remove from the drop down
menu and click OK to remove the selected service from the grid.
Remove Service
button on the toolbar. Select the service to remove from the drop down
menu and click OK to remove the selected service from the grid.
An alternate method of removing services is right click a cell with a service in the active grid display area and selecting Remove Service.
Custom labels can be added to a grid in order to provide
organization and a more detailed grid view for operator use.
A custom label can be added to a grid cell by selecting Grid
-> Add -> Label from the main menu or by clicking the  Add Label button
on the client toolbar. Enter the text to use for the label in the
Enter label text box as well as the Row and Col
coordinates to select which grid cell the label will appear in.
Add Label button
on the client toolbar. Enter the text to use for the label in the
Enter label text box as well as the Row and Col
coordinates to select which grid cell the label will appear in.
An alternative and faster method for adding labels
is to right click a cell displayed in the active grid area and select
Add Label. This option will automatically set the Row and Col
values in the Add Label window to the cell that was clicked on.
To delete an existing grid label select Grid
-> Remove -> Label from the main menu or click the  Remove Label
button on the toolbar. Select the label to remove from the drop
down menu and click OK to remove the selected label.
Remove Label
button on the toolbar. Select the label to remove from the drop
down menu and click OK to remove the selected label.
An alternative method for removing grid labels is to right click a grid cell in the active grid display area containing a label and select Remove Label. This will automatically set the Remove Label Window to the grid cell clicked on. Click OK to remove the selected label.